
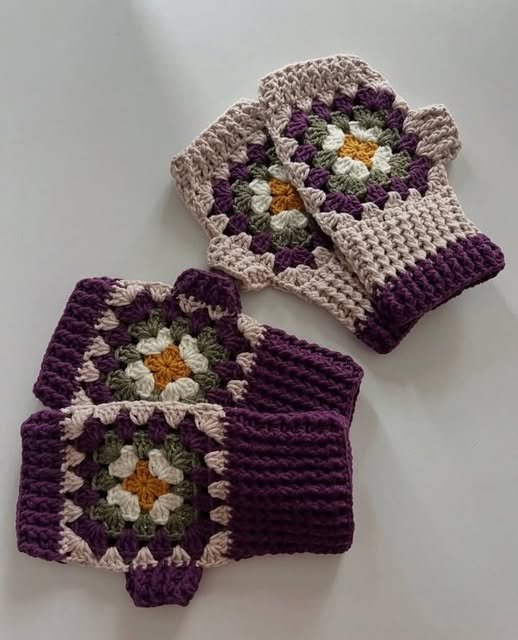
Granny Square Mittens Free Pattern
Granny squares aren’t just for blankets anymore! If you’re looking for a creative way to turn your classic squares into something cozy and wearable, you’re in the right place. These Granny Square Mittens are fun to make, full of charm, and perfect for gifting (or keeping!). They use just four squares each and are a great stash-busting project. Let’s dive into the details so you can get stitching!
🧶Materials
Yarn in 2 colors (Main Color = MC, Contrast Color = CC)
3.5mm hook (for granny squares)
3mm hook (for ribbing)
darning needle
📏 Size
One size fits most adults.
To adjust for size:
-
Go up/down a hook size
-
Make fewer rounds for smaller hands (especially for kids)
-
Adjust ribbing length by altering the starting chain
📐 Gauge
Each finished granny square = 3¾ inches (9½ cm)
🧵 Skill Level
Intermediate
🧾 Abbreviations (US Terms / UK Conversions)
-
sc – single crochet (double crochet)
-
dc – double crochet (treble crochet)
-
ch – chain
-
sp – space
-
st(s) – stitch(es)
-
sk – skip
-
bl – back loop
-
mc – main color
-
cc – contrast color
✨ Notes
-
Alternate MC and CC each round. Join new colors with a slip stitch (sl st).
-
If using only one color, sl st to corner space when starting new rounds.
-
Use the 3.5mm hook for granny squares and the 3mm hook for ribbing.
🧩 Granny Squares (Make 4)
With 3.5mm hook:
Start: Ch4, join with sl st to form ring.
Round 1 (RS):
Ch3 (counts as dc), 2dc in ring, [ch2, 3dc in ring] x3, ch2, join with sl st to top of beginning ch3.
Round 2:
Join new color in corner space, ch3, 2dc in same space, ch2, 3dc in same space.
In each remaining corner space: [3dc, ch2, 3dc].
Join with sl st to top ch3.
Round 3:
Join new color in corner space. Ch3, 2dc in same space, ch2, 3dc in same space.
3dc in each side space.
[3dc, ch2, 3dc] in each corner.
Join with sl st to top ch3.
Rounds 4 & 5: Repeat Round 3, continuing color changes if desired.
🧵 Joining Squares
With right sides together:
-
Sew or sl st two squares together along one full side
-
On the opposite side:
-
Join only the top 3 stitches and bottom 3 stitches,
-
Leave the middle open for the thumb hole
-
✋ Ribbing (Wrist, Top, and Thumb)
Wrist Ribbing
With 3mm hook and MC:
Row 1:
Attach yarn at any seam along the bottom edge with a sl st.
Ch15, sc in 2nd ch from hook and across.
Sl st to next 2 sts along bottom edge of square. Turn.
Row 2:
Ch1, sc in each st working in the back loop only (bl).
Sl st to next 2 sts along square edge. Turn.
Repeat Rows 2 & 3 until ribbing is worked around entire wrist opening.
Don’t fasten off. Turn work inside out and sl st or sc the edges together to join. Fasten off.
Top Ribbing
Attach yarn with a sl st to top edge at side seam.
Repeat ribbing instructions, but ch only 4 to begin.
Fasten off.
Thumb Ribbing
Attach yarn with a sl st at bottom of thumb hole (where 2 squares join).
Repeat ribbing instructions, ch 4 to begin.
Fasten off and weave in ends.
🧤 Finishing
Weave in all loose ends with darning needle.
Repeat all steps to create the second mitten.
Enjoy your cozy, colorful new accessory!
💡 Tips
Make it monochrome or go wild with your color combos.
Add a decorative button on the wrist ribbing for extra flair.
Use soft, non-scratchy yarns for comfort.
We hope you loved this Granny Square Mittens Pattern as much as we did! Be sure to tag us on social media @YarnInspirationPatterns with your beautiful makes – we’d love to see them!
Happy crocheting! 🧶💕