
Floral Granny Square Crochet Pattern
Add a touch of elegance and color to your crochet projects with this gorgeous 3D floral granny square. This pattern features a layered flower with dimensional petals, leafy corners, and a soft border that transforms it into a perfect square. Whether you’re planning to make a blanket, cushion cover, or decorative wall piece, this square is sure to be the highlight.
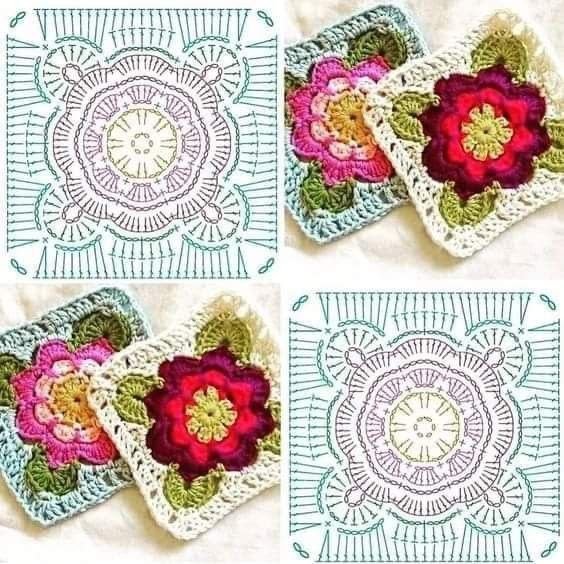
This tutorial provides clear, written step-by-step instructions based on the original crochet diagram. You’ll love how each round builds upon the last, creating a beautiful texture and structure that stands out.
The Floral Granny Square Crochet Pattern is a charming and versatile design that combines the classic granny square structure with the delicate beauty of crochet flowers. This lovely motif has become a favorite among crocheters because it adds elegance, color, and personality to blankets, bags, pillows, and many other handmade creations.
Floral granny squares are especially popular for their flexibility. You can mix bright colors for a cheerful look, use soft pastels for baby projects, or choose neutral shades for a modern style. Each square can be customized to match your personal taste, making every finished project unique and meaningful.
One of the best things about floral granny squares is that they are portable and relaxing to crochet. You can create one square at a time, making them perfect for working on during travel or in short crafting sessions. In this article, you’ll learn how to make a beautiful floral granny square, discover helpful tips, and find inspiration for creative projects.
🧶Materials
Worsted weight yarn or cotton in:
Yellow (center)
Pink (first petals)
Fuchsia or dark pink (second petals)
Green (leaves)
Cream/white (border)
3.5mm or 4mm crochet hook
Yarn needle for weaving ends
Scissors
✂️ Abbreviations (US Terms)
ch–chain
sl st – slip stitch
sc – single crochet
hdc – half double crochet
dc – double crochet
tr – treble crochet
sp – space
st(s) – stitch(es)
FLO – front loop only
BLO – back loop only
🌼 Instructions
Spike-sc = insert hook into lower Rd than usual (as indicated), YO, draw loop through and up to height of current row, YO, draw through both loops on hook. If a spike-sc is worked into a sc, make sure to stitch in-between the post loops of the sc that are visible on the front.
Base: ch6, join with sl st
1. Rd: ch3 (count as 1dc), 1dc into ring, [ch2, 2dc into ring] x 7, ch2, sl st in 3rd of ch-3
2. Rd: [ch3, 1sc in next ch-2 sp] x 8, sl st in 1st of ch-3
3. Rd: ch3 (count as 1dc), 5dc into same ch sp as ch-3, 1sc in next sc, [6dc in next ch-3 ch, 1sc in next sc] x 7, sl st in 3rd of ch-3
4. Rd: ch1, 1spike-sc in next sc of 2.Rd, [ch6, skip the dc sts, 1spike-sc in next sc of 2.Rd] x 7, ch6, sl st in 1st sc
5. Rd: sl st in ch-6 sp, ch3 (count as 1dc), 9dc in same ch-6 sp, *1sc in next sc, 5dc in next ch-6 sp, ch6, 5dc in same ch-6 sp, 1sc in next sc, 10dc in next ch-6 sp*. Rep * 3 more times, omitting 10dc at end of last rep, sl st in 1st sl st.Fasten off
6. Rd: join in any 10dc-petal in the space between the 5th and 6th dc, ch1, 1sc in same space as ch-1, *ch5, skip next (5 dc, 1sc, 5dc), 5dc in next ch-6 (corner) sp, ch2, 5dc in same ch-6 sp, ch5, skip next (5 dc, 1sc, 5dc), 1sc in space between 5th and 6th dc of 10dc-petal*. Rep * 3 more times, omitting sc at end of last rep, sl st in 1st sc
7. Rd: ch3, 3dc in next ch-5 sp, *ch7, skip next 5 dc, 1sc in next ch-2 sp, ch7, skip next 5dc, 3dc in next ch-5 sp, 1dc in next sc, 3dc in next ch-5 sp*. Rep * 2 more times, ch7, skip next 5 dc, 1sc in next ch-2 sp, ch7, skip next 5dc, 3dc in next ch-5 sp, sl st in 3rd of ch-3
8. Rd: ch3 (count as 1dc), 1dc in each of next 3 dc, *7dc in next ch-7 sp, (2dc, ch2, 2dc) in the corner sc, 7dc in next ch-7 sp, 1dc in each of next 7 dc*. Rep *3, omitting 4dc at end of last rep, sl st in 3rd of ch-3
Fasten off.
access our free patterns category here
Each square measures approx. 12–14 cm (5–5.5 inches) depending on yarn and hook.
💡 Tips
-
Use FLO and BLO where needed to enhance the 3D layers.
-
Blocking the square helps it lay flat.
-
Join multiple squares for a throw, pillow, or bag.
This 3D floral granny square is an excellent way to showcase your color palette and layering skills. Whether you’re making a single square or an entire blanket, the textured petals and leaves bring a refreshing and elegant look to your project.