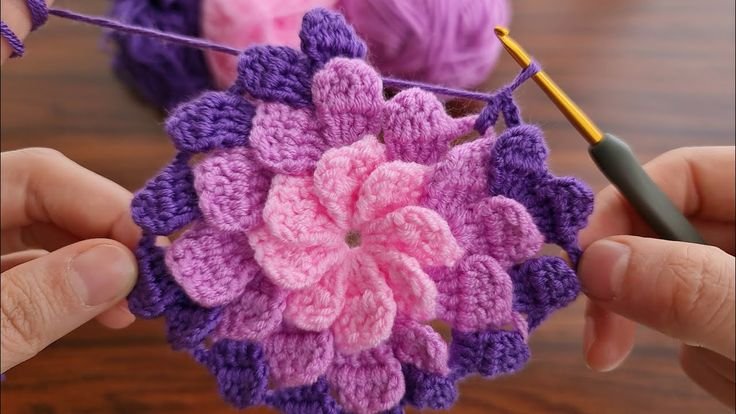
Crochet Tutorial: Simple Baby Blanket Pattern
Welcome to today’s crochet tutorial! If you’re looking for a simple and charming crochet pattern to create a cozy, handmade item, you’re in the right place. This easy-to-follow pattern is perfect for beginners and seasoned crocheters alike, featuring a lovely leaf motif and a smooth flow of color changes that bring warmth and texture to any project.
Whether you’re making a baby blanket, a cozy throw, or just want to add a personal touch to your home, this pattern will guide you step-by-step. Grab your crochet hook and yarn, and let’s dive into this fun and creative project that you’ll love to make and use!
Materials Needed:
Baby yarn (any color)
2.5mm crochet hook

Step-by-Step Instructions:
Start with Magic Ring:
Begin by making a magic ring with your yarn.
Chain 3 stitches (this counts as the first double crochet).
Work 3 double crochets into the magic ring.
Form the First Round:
Chain 3 stitches.
Turn your work and crochet 4 double crochets into the top of the previous round’s double crochets (including the chain 3 from the first stitch).
Chain 3 and turn your work again.
Create the Second Round:
Continue by working 4 double crochets into each space.
Chain 3 and turn.
Form the Leaves:
For the leaves, crochet 4 double crochets in each section of the ring.
After the 4th crochet, chain 3 and turn.
Repeat this process to form the leaves for the blanket.
Closing the Magic Ring:
Once you’ve completed the desired number of leaves (8 in total), finish by pulling the tail of the magic ring to close the center.

Adding the Second Color:
Switch to Second Color:
Attach the new color yarn in one of the spaces between the leaves.
Chain 3 stitches and work 4 double crochets into the same space.
Work Through the Rows:
Continue the pattern by alternating between working 1 and 2 double crochets in the spaces to form the corners and edges.
Continue working in the same manner across each row.
Repeat the Pattern:
Repeat the steps of adding stitches and turning until you achieve the desired size.
Adding the Border:
Add White Border:
Once the main part of the blanket is complete, start the border by attaching the white yarn to a corner.
Chain 3 stitches, then work 4 double crochets into each space.
Finish the Border:
Continue working 4 double crochets in each space, chaining 2 stitches in the corner spaces to form the corners.
Complete the border around the entire blanket, ensuring all edges are neat.
Final Touches:
Complete and Cut the Yarn:
After completing the border, fasten off your yarn.
Cut any loose ends and weave them in securely.
End Result: You’ll have a beautiful and easy-to-make crochet baby blanket with a lovely leaf pattern, perfect for a baby or as a decorative piece for any room!
This pattern can be made larger or smaller depending on your needs, and the design is flexible enough to add additional motifs or change colors as desired.
Video Tutorial:
I hope you enjoyed this simple crochet baby blanket tutorial! By following these steps, you can create a beautiful, versatile piece that’s perfect for gifting or decorating your home. The easy-to-master leaf motif and color transitions give it a timeless, cozy feel that’s sure to impress. Remember, you can customize the size and colors to fit your personal style. Happy crocheting, and be sure to share your completed projects with me—I’d love to see your unique interpretations! Stay tuned for more fun patterns and tips in future blog posts.

I would love to see this pattern completely finished. I can judge if I would want to make this pattern with what Little has shown. So for this reason, I am passing.