Crochet Christmas Tree Hats Free Pattern
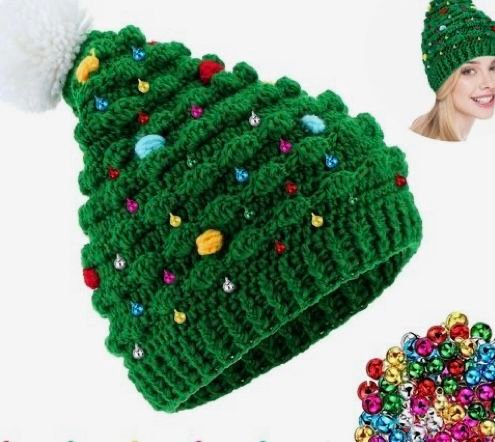
This crochet Christmas tree hat has a ribbed brim and a tall crown trimmed with curls of white crochet. Red edging traces the ruffles like icing, and green pony beads add little dots of color. Finish the point with a pom-pom if you like.
The hat starts at the brim and narrows as you work toward the tip. Each tier begins on the front loops of a round, while the back loops carry the body of the hat upward. Once you spot those two sets of loops, the rest of the pattern follows a repeat you can count as you go.
For a snow-dusted look, swap the white yarn for forest green and edge the ruffles in cream. Add a gold pom-pom at the tip and embroider a few red French knots between the tiers to look like tiny ornaments. If you’re making hats for a family photo, keep the green base and pick a different trim color for each person.
Materials
- White 4-ply acrylic yarn for the brim, body, and ruffles.
- Red 4-ply acrylic yarn for the ruffle edging.
- A 4.5 mm crochet hook for the hat.
- A 4 mm crochet hook for the edging and beads. Check that the bead can slide over the smaller hook and that a loop of yarn can pass through it.
- Green pony beads, optional. The tutorial uses translucent green beads and lets you choose how many to add.
- Locking stitch markers, scissors, and a yarn needle.
- One yarn pom-pom, optional.
Size and fit
The tutorial gives one size worked from 80 foundation chains. The captions give no gauge, yardage, or finished dimensions. Measure around the widest part of the wearer’s head, just above the eyebrows and ears. Try on the brim after Round 8, before starting the first ruffle. It should stretch comfortably around the head and sit snugly. A slightly larger hook can loosen a tight brim, while a smaller hook can firm up a loose one. Keep the same 80 stitches if you rework the brim so the crown counts still apply.
Crochet terms and stitches
This pattern uses US crochet terms.
| Abbreviation | Meaning |
|---|---|
| ch | Chain |
| sl st | Slip stitch |
| sc | Single crochet |
| hdc | Half double crochet |
| dc | Double crochet |
| FPdc | Front post double crochet |
| BPdc | Back post double crochet |
| FLO | Front loop only |
| BLO | Back loop only |
| dec | Double crochet decrease across two stitches, as described below |
| st(s) | Stitch(es) |
- Hdc. Yarn over, insert the hook into the indicated loop, and draw up a loop. Yarn over and pull through all three loops on the hook.
- FPdc. Yarn over, insert the hook from front to back and back out to the front around the indicated stitch post, and draw up a loop. Yarn over and pull through two loops twice.
- BPdc. Yarn over, insert the hook from back to front and back out to the back around the indicated stitch post, and draw up a loop. Yarn over and pull through two loops twice.
- Decrease used in the tutorial. Yarn over, insert the hook in the next st, and draw up a loop. Yarn over, insert the hook in the following st, and draw up a loop. You have five loops on the hook. Yarn over and pull through three loops. Yarn over and pull through the remaining three loops. The decrease uses two stitches and leaves one stitch.
The top of a stitch looks like a V. With the outside of the hat facing you, the strand nearest you is the front loop and the strand behind it is the back loop. The foundation chain’s back bump is the single ridge on the underside of the chain.
Brim
Work with white yarn and the 4.5 mm hook. Keep the same side facing you throughout. Starting chains and joining slip stitches are outside the stitch count. When joining a body or brim round, sl st into the first actual stitch made in that round.
Foundation. Ch 80 loosely enough for the opening to stretch. Lay the chain flat, check that it forms a ring without a twist, and sl st into the first ch.
Round 1. Ch 2. Work 1 dc in the back bump of the chain at the join, then 1 dc in the back bump of each remaining ch. Mark the first dc and sl st into its top to join. 80 dc.
Round 2. Ch 1. Work 1 FPdc around the first dc from Round 1 and 1 BPdc around the next dc. Repeat this pair around the brim and join with a sl st to the first FPdc. 80 sts.
Rounds 3–8. Ch 1. Work 1 FPdc around each FPdc and 1 BPdc around each BPdc. Join to the first FPdc of each round. 80 sts each round. Before joining Round 8, mark the back loop of its first stitch so you can find it behind the ruffle.
First ruffle and first decrease
Round 9 — First ruffle. Ch 1. Working in the FLO of Round 8, make 3 hdc in the first st and 2 hdc in the next st. Repeat that pair all the way around. Mark the first hdc if you plan to add trim. Leave the ruffle edge open at the join and go straight to Round 10. 200 hdc.
Round 10 — Body behind the ruffle. Lift the ruffle and locate the marked back loop of the first stitch of Round 8. Sl st into that loop and ch 2. Work 1 dc into that same back loop, then 1 dc in each remaining back loop of Round 8. Join to the first dc. 80 dc. Add pony beads while working this round if desired.
Round 11 — First decrease. Ch 2. Work 1 dc in the first st at the join and in each of the following 7 sts. Work a dec across the next 2 sts. Repeat the sequence of 8 dc and 1 dec seven more times. Join to the first dc. 72 sts.
Shape the rest of the crown
Follow the chart below. The ruffle and the double crochet round behind it use the front and back loops of the same underlying round. For example, Rounds 12 and 13 both attach to Round 11. The ruffle stitch totals are separate from the body totals.
- Ruffle. Ch 1 and work in the front loops of the underlying round. For each ruffle through Round 27, work 3 hdc in the first loop and 2 hdc in the next, then repeat that pair around. In Rounds 30, 33, and 35, repeat the pair in reverse order, beginning with 2 hdc and then 3 hdc. Move directly to the back loops for the next round whenever one is listed.
- Body round. Sl st into the first back loop of the same underlying round, ch 2, and work 1 dc in each back loop, beginning in the loop at the join. Join to the first dc. A marker in the first back loop, placed before you start the ruffle, helps you find the right loop.
- Decrease round. Ch 2. Start in the first stitch at the join and work through both loops. Use the repeat in the chart 8 times total for each decrease round. Mark the back loop of the first dc for the next tier and join to that dc.
| Ruffle round in FLO | Body round in BLO | Decrease round and repeat | Body count after decrease |
|---|---|---|---|
| 9 · 200 hdc | 10 · 80 dc | 11 · 8 dc, dec | 72 sts |
| 12 · 180 hdc | 13 · 72 dc | 14 · 7 dc, dec | 64 sts |
| 15 · 160 hdc | 16 · 64 dc | 17 · 6 dc, dec | 56 sts |
| 18 · 140 hdc | 19 · 56 dc | 20 · 5 dc, dec | 48 sts |
| 21 · 120 hdc | 22 · 48 dc | 23 · 4 dc, dec | 40 sts |
| 24 · 100 hdc | 25 · 40 dc | 26 · 3 dc, dec | 32 sts |
| 27 · 80 hdc | 28 · 32 dc | 29 · 2 dc, dec | 24 sts |
| 30 · 60 hdc | 31 · 24 dc | 32 · 1 dc, dec | 16 sts |
| 33 · 40 hdc | 34 · 16 dc | — | 16 sts |
| 35 · 40 hdc | — | — | Close the crown |
For Round 35, work the final ruffle in the front loops of Round 34 and leave its 16 back loops free for the closure. If a decrease round comes out short, look for a stitch hidden beside a bead or a stitch missed at the join. Count the body stitches before starting the next tier.
Add beads as you crochet
The tutorial places beads on the double crochet body and decrease rounds, and on the red edging. Their spacing is up to you. To add one, finish your chosen stitch, enlarge the working loop slightly, and lift out the hook while holding the loop. Slide a bead onto the smaller hook. Catch the working loop and pull it through the bead. Settle the bead on the outside, return to the hook you were using, and work the next stitch as usual. The bead adds no stitch to the count.
Close and finish the hat
Close the point. After the final ruffle, fasten off the white yarn and leave a long tail. The captions call for closing the small remaining opening. To gather it neatly, thread the tail onto a yarn needle and pass it through the 16 unused back loops of Round 34. Draw them closed, secure the tail inside the crown, and weave it in.
Edge the ruffles. With the 4 mm hook, join the red yarn with a sl st to the first hdc of a ruffle. Ch 1 and sc in that same hdc, then sc in each hdc around the ruffle edge. The sc count matches the hdc count for that ruffle. Add beads wherever you like. Join to the first sc, fasten off, and repeat on each ruffle. Work the edging loosely enough to let the curls keep their shape.
Finish the top. Weave in the remaining ends. For a pom-pom, thread its yarn ties to the inside through two points near the center of the crown. Tie them securely inside and weave in the ends.