Butterfly Crochet Bag Free Pattern
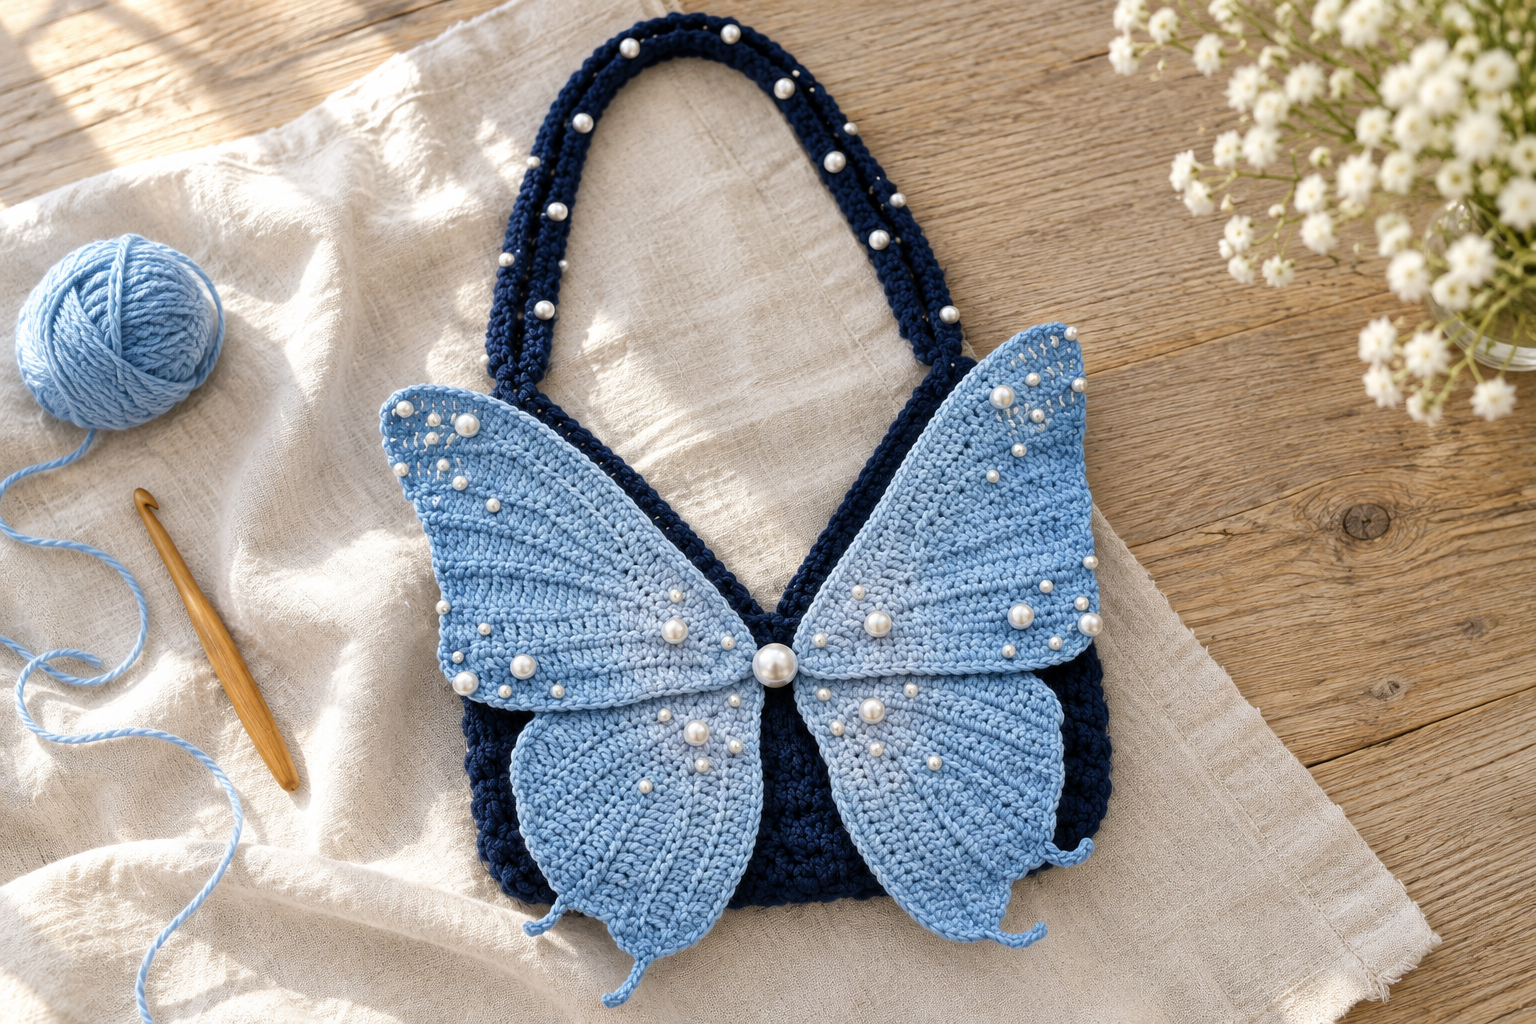
A butterfly crochet bag turns an everyday accessory into a small piece of wearable textile art. The navy body gives the design depth, while four powder-blue wings create a soft, sculptural butterfly across the front. A scattering of pearls highlights the stitches without hiding their handmade texture.
This project combines a practical three-square crochet body with separately shaped wings. It is a lovely choice for crocheters who enjoy assembling motifs and watching a design come together one section at a time. The blue color combination is inspired by the reference photo supplied with this project; the accompanying video demonstrates pink-and-cream and brown-and-cream variations.
Below, you will find a guide to the construction, materials, stitches and finishing choices. The free printable PDF at the end includes the expanded row-by-row wing sequences, body instructions, assembly diagrams and video checkpoints.
Pattern source: This article and its printable guide are written companions to the supplied Mimi Handmade butterfly bag tutorial. They use US crochet terms. The instructions have not been independently crochet-tested; the PDF identifies a source discrepancy in the final upper-wing border rather than presenting an uncertain count as verified.
What Makes This Butterfly Bag Special?
The butterfly is built from four individual pieces: two taller upper wings and two rounded lower wings. Changing from short stitches to taller stitches creates the sweeping edges. Small chain extensions on the lower wings form delicate curled tips, adding movement to the silhouette.
The bag underneath is equally interesting. Three solid crochet squares are joined along paired edges and allowed to fold into a pouch with a V-shaped mouth. Using two strands together gives the body a firmer fabric, while single-strand wings remain lighter and easier to shape.
Pearls provide the finishing detail. You can keep the decoration sparse or arrange a mixture of sizes across the wings. For a version closer to the blue reference photo, add a decorative central pearl and stitch a few smaller pearls along the shoulder strap.
Materials
- 5-ply milk-cotton yarn, or a comparable yarn selected by swatching, in navy and powder blue.
- A 3.5 mm crochet hook for the body and strap, worked with two strands held together.
- A 2.5 mm crochet hook for the wings, worked with one strand.
- Scissors, yarn needle, stitch markers, a fine beading needle and strong matching thread.
- Two strap rings and a sew-on magnetic closure or tab.
- Assorted sew-on pearls, approximately 4 mm, 6 mm and 8 mm; a central decorative pearl is optional.
- An appropriate attachment method: the tutorial uses hot glue, while the PDF also explains a sewn alternative.
The tutorial shows yarn packaged in 125 g balls, but that does not establish the total amount required. Finished dimensions, gauge and total yarn consumption cannot be reliably confirmed from the supplied materials. Start by making one square and recording its size, then make the other two squares to match.
Skill Level and Abbreviations
This is an intermediate crochet project. The body is straightforward, but the wings involve short rows, increases, decreases and stitches placed along exposed edges. A confident beginner may prefer to use the written guide alongside the video.
US abbreviations used in the PDF include ch (chain), sl st (slip stitch), sc (single crochet), hdc (half double crochet), dc (double crochet), tr (treble crochet), sk (skip), st (stitch), dc2tog and tr2tog. An increase means working two stitches into the same stitch. A mixed increase, such as (dc, tr), places both stitch types into one base stitch.
Turning chains are not treated the same way in every wing row. In some rows they stand in for the first stitch; in others, actual stitches are worked into the first stitch after the chain. Follow the individual row instructions instead of applying a single turning rule throughout the project.
Step 1: Crochet Three Solid Squares
Hold two strands of navy yarn together and use the 3.5 mm hook. Begin with a magic ring. For the first round, make four groups of four double crochets, separated by chain-three corner spaces. The beginning chain three counts as the first double crochet. Join the round with a slip stitch.
For Rounds 2 through 6, work one double crochet into every double crochet and work (2 dc, ch 3, 2 dc) into each corner space. Join each round without turning. The completed stitch totals are 16, 32, 48, 64, 80 and 96 double crochets, with four corner spaces in every round.
Finish each square with a single-crochet border: one single crochet in each double crochet and three single crochets in each corner space. This gives 108 single crochets around the bordered square. Use navy for a seamless color effect, or choose a contrasting border if you prefer visible joins.
Step 2: Assemble the Body
Label one square as the base and the other two as the sides. Each side square joins to two adjacent edges of the base square. The remaining two edges of each side square form the mouth of the bag. Mark the middle stitch of every three-stitch border corner so the seam endpoints stay aligned.
Work the first L-shaped join with right sides together, matching corresponding border loops. Add the third square along the remaining two edges of the base. Turn the work right side out and let the squares fold naturally into the pouch shape. The PDF includes a seam map and video stills to make this arrangement easier to follow.
Before continuing, open the bag and check the interior. It is much easier to correct a misplaced join now than after the wings and pearls have been attached.
Step 3: Make the Strap
The video demonstrates a rotating crochet cord worked with the body yarn held double. Begin with three chains, work a single crochet into the first chain, then rotate the work and continue crocheting through the pair of side strands exposed by each turn. Repeat until the cord reaches the length you want.
The instructor suggests approximately 130-135 cm (51-53 inches) for the long adjustable strap. A shorter shoulder strap can be measured to suit the wearer and gives a look closer to the blue reference photo. The PDF explains the cord and provides a fully specified fixed-length fastening option, because the video’s sliding-knot arrangement is not described precisely enough to reproduce confidently from text alone.
Step 4: Shape the Upper Wings
Switch to one strand of powder-blue yarn and the 2.5 mm hook. Each upper wing begins with 23 chains and a first row of 22 single crochets. Following rows combine slip stitches, single crochets, half double crochets, double crochets and trebles to create the long, curved upper outline.
Several rows stop before reaching the end of the preceding row. These short rows are intentional. Leave the remaining stitches unworked and continue exactly as directed; later edge shaping uses the exposed stitches and row ends.
Make two upper wings using the same yarn and tension. Arrange them as a mirrored pair before attaching them. The complete sequence is in the PDF, including the additional increase at the outer edge of Row 2, which is easy to miss in the small on-screen formula.
Step 5: Crochet the Lower Wings
Each lower wing starts with 29 chains and a first row of 28 single crochets. Two short chain extensions are worked back with slip stitches to form the decorative tails. These extensions are part of the shaping, not ordinary turning chains.
The lower wings also combine short rows and stitches worked along exposed edges. Take particular care at Rows 7, 13 and 15, where the hook moves onto a neighboring edge. The printable guide separates these transitions from the regular stitch sequence so they are easier to locate.
Once both lower wings are complete, lay out all four wings together. Compare their proportions, weave in loose ends and gently shape them using a method suitable for your yarn. The goal is a balanced pair on each side, not a rigidly stretched fabric.
Step 6: Attach the Butterfly
Place the bag flat with its front facing upward. Position the upper wings first, bringing the narrow inner ends toward the center. Add the lower wings underneath, with a slight overlap beneath the upper pair. Keep the V-shaped opening accessible.
The tutorial attaches the wings with hot glue in small sections. If you prefer sewing, pin or baste the pieces in place, then use small stitches through the back of each wing and only the front layer of the bag. Secure the supported edges and inner areas while leaving the decorative tips free. This sewn method is an alternative supplied in the guide.
Using powder-blue yarn directly creates the requested color palette without painting. The video also shows a pink gradient, but any optional textile color should be tested on a swatch and fixed according to the product instructions. Colorfastness cannot be assumed for every marker, paint or cosmetic.
Step 7: Add the Closure and Pearls
Fit the magnetic closure before adding the final decorative beads. Sew its front and back sections in matching positions, making sure the mouth closes without pulling the butterfly out of shape. A large central pearl is decorative; it does not automatically replace a working fastening.
Stitch the pearls individually with strong matching thread, passing through each bead several times and securing the thread on the reverse. Mix sizes for a soft, scattered effect. A few larger pearls can anchor the arrangement, while smaller ones fill the spaces between them.
Finish by checking the strap joins, opening the bag fully and testing it with a light load. Follow the yarn and hardware care instructions. Spot-clean delicate decorated areas, avoid wringing and dry the bag supported in shape.
A Note About the Printable Instructions
The printable guide follows the visible stitch formulas and the supplied translated subtitles, but the sources do not agree on every detail. In particular, the upper-wing border is labeled 45 single crochets on screen, while the translated narration mentions 44 single crochets followed by a joining slip stitch. The guide flags this discrepancy and the preceding edge transition for checking against a physical sample.
This makes the PDF a detailed video companion rather than a claim of a fully tested, size-graded pattern. If you plan to publish measured sizes or exact yarn requirements, crochet a sample first and record those details for your chosen yarn and tension.
Butterfly Crochet Bag Pattern PDF
Ready to bring the pieces together? The free printable guide includes the six-round body, complete visible wing sequences in US terms, a strap tutorial, seam and placement diagrams, finishing instructions and a timestamp map for the supplied video.
With its layered blue wings, navy background and delicate pearls, this butterfly bag offers plenty of room for thoughtful color choices and personal finishing touches. Take your time with the shaping, check the pair of wings before assembly and enjoy seeing each separate piece become part of the finished butterfly.